31 March 2014

Quick sauces for your spring pasta dishes


In these early days that are finally starting to hint of spring, I find myself eating less and wanting lighter, cleaner flavors (much like this blog's spring redesign).  I also don't want to hover near a hot stove for long periods of time when I could be outside prepping the garden rows, enjoying a cocktail on the front porch, or otherwise enjoying the extra minutes of sunshine.  These pasta dishes are super easy and fast to make, and the sauces can be made ahead and tossed directly into hot pasta for a very fuss-free, healthy meal.  I welcome you to add your own variations in the comments section at the end of this post!


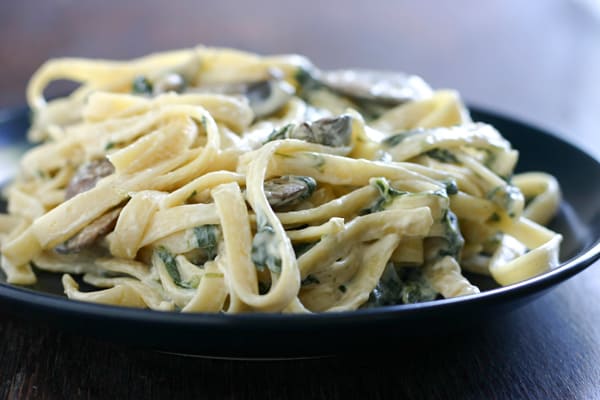
Fettuccine with Almond-Corn Cream 
(adapted from loveandlemons.com)

Serves 6

1.5 cups almonds, blanched or soaked overnight
1.5 cups corn kernels, blanched (fresh or frozen)
1 cup water
2 tablespoons olive oil
1 garlic clove, minced
juice of 1/2 a lemon
1 tablespoon honey
salt to taste
1 lb. fettuccine
2 cups baby spinach leaves
1/4 cup fresh basil leaves, thinly sliced
red pepper flakes to taste

Bring a well-salted pot of water to boil and cook fettuccine according to package directions.  

Meanwhile, in a high-speed blender, combine the almonds, corn, water, olive oil, garlic, lemon, honey, and a dash of salt and blend until creamy and smooth.  Taste and adjust ratios/seasoning to your liking. You can refrigerate this sauce for up to two days ahead of time. 

In the last 30 seconds or cooking the pasta, toss in the spinach leaves and allow to wilt.  Drain pasta, reserving about 1/2 cup of the cooking liquid in a separate bowl.  Toss the pasta with the sauce in a large serving bowl and add cooking water a little bit at a time as necessary to thoroughly coat noodles.  Toss once more with the basil and red pepper flakes if using and add more salt if necessary.  


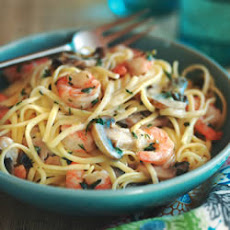
Shrimp Linguine with Mustard and Cream
sauce adapted from New York Times

Serves 6

1 pound linguine
1 tablespoon olive oil
1 pound deveined shrimp, tails removed
1 jalapeño chile, seeds removed and finely chopped
salt and black pepper
1 cup crème fraîche or crema
3 tablespoons Dijon mustard
Pinch of cayenne
2 tablespoons chopped chives
1 tablespoon fresh lime zest
6 scallions, thinly sliced
1 tablespoon tarragon leaves, roughly chopped

Bring a well-salted pot of water to boil and cook fettuccine according to package directions. 

Meanwhile, in a large skillet, heat the olive oil over medium-high heat.  When it smokes, add the shrimp and cook for 2 minutes on one side, 2 minutes on the other, until pink all the way through. Add the jalapeño and cook until it starts to go soft, about 1 minute, stirring frequently. 

Lower to medium-low heat and add the crème fraîche, mustard, and cayenne and season with salt and pepper. Drain pasta and add to skillet. Toss gently to coat pasta. Add the lime zest, chives, scallions and tarragon and toss to coat. 


28 March 2014

Turn every trip into a beer and food tour!


I drive through some pretty unromantic places on my way to gigs (and I'm headed your way soon, Rock Springs!), so I always try to perk up the landscape by finding some decent places to eat and drink. My favorite new find is http://www.brewtrail.com/, where you can find up-to-date lists of breweries in every state and even plan out beer tours based on the places you want to visit.


http://www.opentable.com/ is helpful for finding upscale restaurants in urban areas around the country, but nothing beats good old triumvirate of Trip Advisor (reviews written mostly by polite family-minded people), Urban Spoon (reviews by gypsies and hipsters) and Yelp (get a full helping of crazy here) to check up on the local holes-in-the-wall.


I suppose there's the personality-less Google search for everything else...anyone else have any clever searches for finding hidden gems across the country or abroad?


25 March 2014

An inspired pantry-cleaning casserole


I generally only buy giant pasta shells to use up extra bits of ricotta or cottage cheese that won't support a full-size lasagna.  And then I end up with too many shells.  And then I buy marinated artichokes when they're on sale because they make for a quick pasta stir-in, and I don't use them for about a year.  You probably have some similar stories here.  Insert canned tuna, frost-covered frozen vegetables, and whatever pasta shape you have collecting dust on your shelf; you can easily adapt my little one-pot recipe here to correct your own indiscriminate purchases.  It's a delicious way to satisfy your spring cleaning frenzy or feed your face after a long trip away when you don't want to hit the grocery store on your way back into town.


Artichoke and Cheese Shells

Serves 2

12 large macaroni shells
2 cups vegetable stock
12 marinated artichokes (about  8 oz. jar)
¼ cup crumbled feta cheese
¼ cup shredded mozzarella
1 teaspoon red chili flakes
½ teaspoon dried oregano
¼ cup shredded Parmesan
1 cup prepared or homemade tomato sauce
2 tablespoons capers

Preheat oven to 425°F. Combine feta, mozzarella, red pepper flakes, and oregano in a small bowl.  Season with salt to taste.

In a Dutch oven or large oven-proof skillet, bring the vegetable stock to boil.  Add the shells and cook until a little firmer than al dente, about 8 minutes.  Remove shells from cooking liquid and reserve a scant cup of the broth in the bottom of the pan.

Allow shells to cool to the touch.  Stuff each shell with one artichoke heart and 1/12 of the cheese mixture.  Please each shell in the shallow pool of vegetable stock remaining in the Dutch oven. Pour the tomato sauce evenly over the top and scatter the capers and Parmesan cheese over that. Cover with a lid and place in the oven; bake 25 minutes or until cheese is thoroughly melted.  Serve with warm crusty bred and copious amounts of red, red wine.


21 March 2014

Spicy Cashew and Cauliflower Curry

I first read about soaking nuts for savory recipes in Caroline Wright's blog. It softens them enough that they act more like a meat and can be more easily incorporated into a dish, rather than just flying off the plate every time you stab one or standing out like a handful of rocks in an otherwise mushy pile of food.  Cashews works really well for this technique, and this recipe satisfies my craving for the flavor of korma without all the fuss and heavy cream.  It also takes 20 minutes or less, depending on how quickly you can cook your rice, making this a perfect weeknight meal.


Spicy Cashew and Cauliflower Curry

Serves 4

1 head cauliflower, broken into small florets
1 cup cashews, soaked overnight
2 tablespoons peanut or canola oil
½ yellow onion, diced
1 ½ teaspoons mustard seeds
1 teaspoon cumin seeds
3 garlic cloves, minced
1 teaspoon salt
2 tablespoons fresh grated ginger
1 fresh hot green chile, minced
1 teaspoon tomato paste
10 oz. frozen peas, thawed
¼ cup fresh chopped cilantro
1 tablespoon lemon juice

2 cups jasmine rice

Soak cashews overnight in water.  Drain just before you start cooking.

Cook rice according to package directions.

Heat the oil in a large skillet over medium-high heat.  Add the cauliflower, onion, seeds, garlic, ginger, chile, and salt. Cook, stirring frequently, until onion becomes soft, about five minutes.  Add tomato paste, peas, cashews, cilantro, and ¼ cup water.  Cover and cook five more minutes.  Uncover and continue to cook, stirring frequently, another 2 minutes or until cashews begin to brown.  Stir in lemon juice and season with more salt to taste. Serve over rice.


17 March 2014

The Irish aren't the only cabbage lovers!

I enjoy a good helping of Colcannon as much as the next gal, but there are plenty of other ways to enjoy crisp, sweet, early spring cabbage besides hiding it in mashed potatoes.  I grew up eating it "creamed" at the holidays, a dish that sharply divided the family into lovers and haters.  My grandma would boil sliced cabbage in milk, butter, and a little salt, and when it was good and mushy, she'd stir in enough flour to make the sauce a medium-thick paste.  The smell of that thoroughly boiled cabbage would complete with even the smell of turkey roasting in the oven, filling rooms on the other side of the house for days afterwards. Now that I think of it, the room may have been divided into dutiful vegetable eaters and people who wanted to enjoy their meals.  But I loved it! I was, like, five, and I didn't have to chew it very much.  

What I didn't ever eat growing up, even though I am partially Lithuanian and hail from the south suburbs of Chicago, is holubki (golabki if you're Polish).  These silky smooth cabbage rolls are usually filled with ground meat and onion and smothered in a mild, faintly exotic tomato sauce, but they are just as easily filled with rice, lentils, and mushrooms, as I have done here, or any other combination of grains and protein you favor. The recipe has several steps, but it's not complicated to execute, and it will fill your house with the old-world smells of a comforting casserole, lovingly prepared by your babushka, even if you never had one.  Holubki will also necessarily yield some extra steamed cabbage, which you can save for a round of Thai-style spaghetti squash later in the week.  


Vegetarian Holubki

Serves 4 (two rolls each)

1 large cabbage
2 cups brown rice, cooked
2 cups brown lentils, cooked
1/2 cup onion, minced
1 garlic clove, minced
4 oz. mushrooms, cleaned and chopped
1 teaspoon ground ginger
1 tablespoon sweet paprika
1 tablespoon parsley, chopped
1 teaspoon black pepper
2 eggs
1/2 cup vegetable broth
2 tablespoons olive oil
1 (12 ounce) can diced tomatoes
1 (12 ounce) can tomato sauce

Core cabbage, place in pot and cover with water. Bring to a boil. Lower heat to medium and cover with a lid. Cook until slightly softened. Remove cabbage and place in a dish to cool.

Meanwhile, in a large pot, saute onions, mushrooms, and garlic in the olive oil until transparent. Remove from heat and add lentils, rice, spices, egg, and vegetable broth. Mix well.

When cabbage is warm to the touch, peel leaves and place on cutting board. You should have eight  large leaves.

Preheat oven to 375°F.

Divide filling mixture into six equal parts.

Fill cabbage leaves and roll tucking in ends like burritos. Place filled rolls with folded end down into baking dish.

Combine tomato sauce and tomatoes along with tomato juice from can in separate bowl. Add half of ¼ cup water to sauce. Mix well.

Ladle over rolls. Cover rolls in aluminum foil and bake for 45 minutes or until cabbage is easily poked with a fork.


14 March 2014

A new kind of potato salad

This is really just a combination of one of my favorite roasted vegetables, potatoes, and a variation on Smitten Kitchen's Kale Salad, but putting the whole mess in the oven makes for a tasty dinner salad or side to accompany fish, and the kale gets a little dried out here and there, reminiscent of kale chips but still substantial enough to actually feel like you're eating food. Sprinkle a little smoked paprika on top if you're missing the meat--the smokiness will make this seem even more complete!


Roasted Potatoes and Kale

Serves 4

1 tablespoon olive oil
1 lb. fingerling potatoes, scrubbed and cut into 2- inch pieces
1 bunch kale, washed and finely sliced (chiffonade)
1/8 cup balsamic vinegar
1 tablespoon grainy mustard
1 teaspoon honey
Black pepper to taste
1 teaspoon kosher salt
2 tablespoon finely chopped fresh parsley
2 tablespoons roughly chopped kalamata olives

Preheat the oven for 425°F.  Toss the potatoes with the olive oil and kosher salt on a baking sheet and place in the oven.  Roast potatoes until lightly browned, about 20-25 minutes.

Meanwhile, combine the vinegar, mustard, honey, and black pepper in a medium bowl.  Add the kale and stir thoroughly to combine.  Set aside until the potatoes are golden, then add them to the baking tray with the potatoes.  Stir to combine and put back in the oven to cook another 10 minutes, or until kale is wilted.

Remove from oven, stir in the parsley and olives, season to taste, and serve.  Leftovers can also be eaten cold with enough plain yogurt and dash of lemon juice stirred in to create a creamy potato salad.

11 March 2014

Texas barbecue, my style

The title of this post is terribly deceptive, because I am really not that into Texas barbecue.  I do not think beef is ever the right choice of meet for slow, smoky cooking (ooh, get out the voodoo dolls with my photo on them!), and sticky-sweet sauce is just boring.  But probably the best tacos I ever had were in Houston, long ago on a trip to audition for graduate school, and they were filled with beautiful, perfectly seasoned pork carnitas.


Texas-style Pork Carnitas

Serves 6-8

3 pounds boneless pork shoulder or pork butt, cut into 2-inch cubes
1/2 cup orange juice
1/4 cup lime juice (from about 2 to 3 limes)
4 cloves garlic, peeled and crushed
1 jalapeno, seeded and minced
1 teaspoon ground cumin
1 teaspoon Kosher salt, plus more to taste
Corn tortillas, for serving 
Toppings: avocado slices, chopped cilantro, shredded cabbage, sliced red onion, and lime wedges

Place the pork in a large Dutch oven or heavy pot. Add the orange juice, lime juice, garlic, jalapeno, cumin, salt and enough water to just barely cover the meat. Bring the pot to a boil and then reduce the heat to a simmer. Simmer uncovered for two hours. Don’t touch the meat.

After two hours, increase the heat to medium-high and while occasionally stirring and turning the pieces, continue to cook for about 45 minutes, or until all of the liquid has evaporated, leaving only the rendered pork fat. Let it sizzle in this fat long enough to brown at the edges, turning pieces gently, only as needed.

When pork has browned on both sides, it’s ready. Adjust seasonings to taste and serve on warmed tortillas with fixings

07 March 2014

Brazil reminds me to get my servings of fruit!

Still fantasizing about beautiful, warm weather, and that brings me to Brazil.  The food was incredible all 'round (well, except maybe for that weird room temperature, unseasoned broccoli at every meal), but what really stuck with me was the wide variety of fruits and fruit juices served all day long. I drank cashew juice (you really have to get that one sweetened, however), ate amazing berries and melons I couldn't pronounce, and perhaps most amazingly, I learned to like bananas.  This is no small feat for me, as for most of my life I have grown queasy at the mere smell of them. But in Brazil there were so many varieties, textures, and flavors of banana and plantain (as well as many people insisting I try each one), that I finally got over it.  So, in appreciation to Brazil and its citizens for opening my world, I bring you what I hope is a responsible rendition of some simple baked bananas I had there.  They are surprisingly good with a grilled cheese sandwich, or just alongside black beans and rice.


Brazilian Baked Bananas

Serves 4 as a side

4 large, ripe bananas or sweet plantains
butter
cinnamon

Preheat oven to 450°F. Coat a baking sheet with a thin layer of butter.

Peel the bananas/plantains and cut on the diagonal into 1/2 inch slices. Arrange in single layer and sprinkle with a little cinnamon. Bake, turning occasionally, for 10-15 minutes, until bananas are golden brown and very tender.


04 March 2014

Hawaii in my mind...


Who's fed up with winter weather?!  When March approaches and winter is nowhere near over (which is every March in the Rockies), my mind wanders to some of the glorious trips I have made to warm places. Today's instrument of denial: Hawaii.  I visited back in 2006 and again in '08, and it continues to inspire my fantasies every winter!

On my first stay, I stumbled upon the amazing Saturday farmer's market in Honolulu on the edge of the university campus.  The variety of fruits and vegetables I never even knew existed was revolutionary for me. And while I cannot find the majority of those fascinating edible plants here on the mainland, the goal of keeping bright colors on my plate in large quantities, coupled with the sublime fusion of Asian and island flavors, has inspired me to develop and come back to this salad again and again.


Hawaiian Hot Pot

Serves 3-4
1 cup short grain brown rice
1 (large) head bok choy (cut in half lengthwise)
1 Vidalia onion (cut into 3 lengthwise)
1 Bell Pepper (cut in half and remove the seeds and stem)
½ fresh Pineapple
2 cups boiling water
4 tablespoons white miso paste
1 tablespoon fresh grated ginger

Dressing
¼ cup Soy Sauce
2 tablespoons Rice Wine Vinegar
¼ teaspoon Dried Ground Ginger
2 teaspoons Sesame Oil
Chili Garlic Paste (optional, to taste)

Preheat a grill pan over medium-high heat on the stove. If it's not non-stick, use a little cooking spray to keep veggies from sticking. 

Cook the brown rice according to package directions. Combine boiling water, miso paste, and ginger, whisk thoroughly to incorporate, and keep warm.  You can also make the dressing in a medium bowl by whisking all ingredients together and set aside.

Add the veggies to the grill when it's hot and grill until they get grill marks and begin to soften (about 5 minutes on each side).


Remove the veggies from the grill and chop them when they have cooled enough to handle. In either a large serving bowl or individual bowls, place the cooked rice topped with grilled vegetables.  Drizzle dressing on top and pour the miso broth down the side of the bowl so you have a mound of rice and veggies surrounded by a little lake.  Dig in!